Pull Facebook Feed Into Android Studio
How to create a Facebook login using an Android App?
In this article, it is explained how to create an Android App that has a Facebook login in it.
There are various social login features to use in Android applications. Here we will learn social login using Facebook, so need to integrate Facebook SDK in project to make use of Facebook login.
Below are the various steps on how to do it;
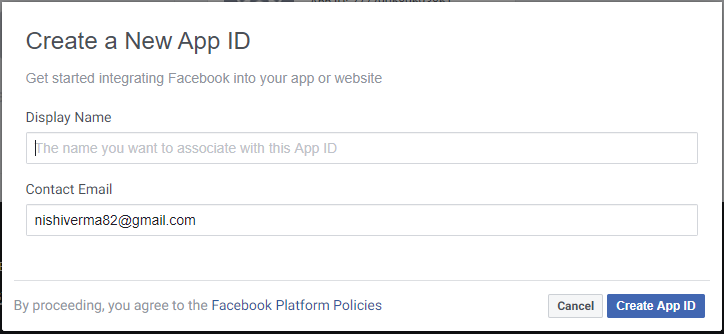
- First thing you need to do is to have Facebook Developer Account and then create a new app.
- Install Android Studio(>= 3.0) and then open/create a project where you want to add Facebook login.
- In your project, add the following code in your Gradle Scripts -> build.gradle (Project).
buildscript{repositories {jcenter()}} - Now, add the following code in Gradle Scripts -> build.gradle (Module:app) with the latest version of Facebook Login SDK in your project.
dependencies {implementation 'com.facebook.android:facebook-android-sdk:5.0.0'} - Sync your project
- Now open app -> res -> values -> strings.xml file to add the following lines and replace the [APP_ID] with your APP_ID, which you can get from Facebook Developer console.
<stringname="facebook_app_id">[APP_ID]</string><stringname="fb_login_protocol_scheme">fb[APP_ID]</string>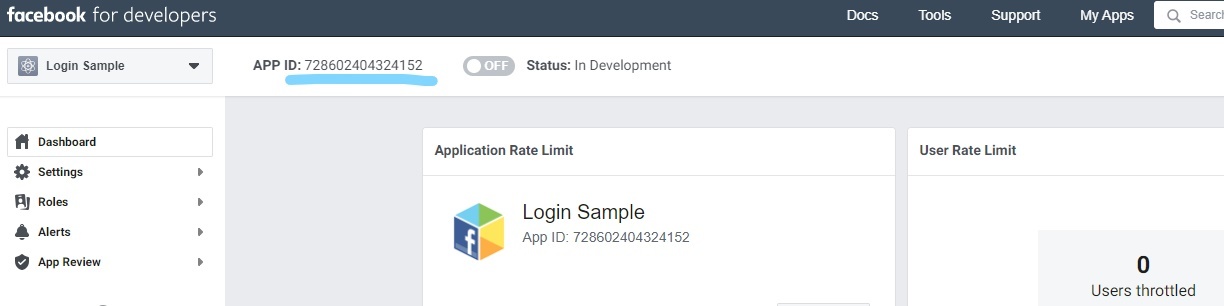
- Open app -> manifest -> AndroidManifest.xml file and add this line outside of application element.
<uses-permissionandroid:name="android.permission.INTERNET"/> - Add this meta-data element inside your application element in AndroidManifest.xml file:
<meta-dataandroid:name="com.facebook.sdk.ApplicationId"android:value="@string/facebook_app_id"/><activityandroid:name="com.facebook.FacebookActivity"android:configChanges="keyboard|keyboardHidden|screenLayout|screenSize|orientation"android:label="@string/app_name"/> - Now first thing you require is Key Hash, so add these lines in your activity class before Facebook login code:
@OverrideprotectedvoidonCreate(Bundle savedInstanceState){super.onCreate(savedInstanceState);setContentView(R.layout.activity_login);... printHashKey();...}...publicvoidprintHashKey(){try{PackageInfo info= getPackageManager().getPackageInfo("com.android.facebookloginsample",PackageManager.GET_SIGNATURES);for(Signature signature : info.signatures) {MessageDigest md= MessageDigest.getInstance("SHA");md.update(signature.toByteArray());Log.d("KeyHash:",Base64.encodeToString(md.digest(),Base64.DEFAULT));}}catch(PackageManager.NameNotFoundException e) {}catch(NoSuchAlgorithmException e) {}} - Now run your application in your emulator or on your connected device. You will see Key Hash value printed in logcat, save this for later requirement.
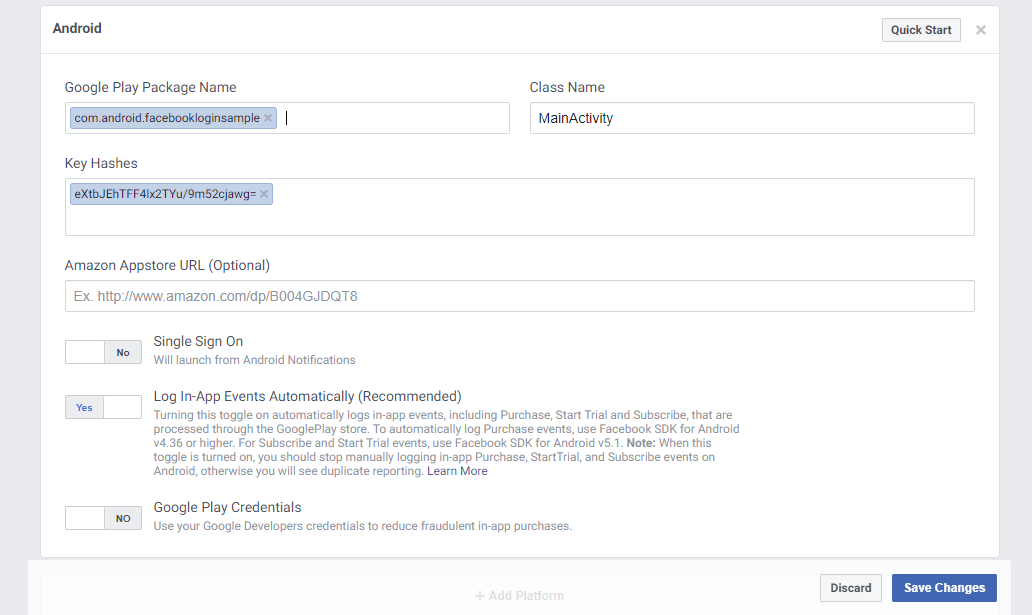
- Go to Facebook Developers console and choose setting -> Basic -> Add Platform (in bottom of page) and a popup will opens up to select a platform. Choose Android as a platform.
- Add your project package name under 'Google Play Package Name'. Add class name where login will implement in project like 'LoginActivity' and also add the key hash value under 'Key Hashes'.
- Now back to android studio, add this custom button in your *.xml layout file:
<Buttonandroid:id="@+id/button_facebook"style="@style/FacebookLoginButton"android:layout_width="match_parent"android:layout_height="45dp"android:layout_gravity="center_horizontal"android:layout_marginTop="15dp"android:text="Continue With Facebook"android:textAllCaps="false"android:textColor="@android:color/white"/> - Add this code in app -> res -> styles.xml file:
<stylename="FacebookLoginButton"><itemname="android:textSize">14sp</item><itemname="android:background">@drawable/facebook_signin_btn</item><itemname="android:paddingTop">11dp</item><itemname="android:paddingBottom">11dp</item><itemname="android:paddingLeft">15dp</item><itemname="android:layout_marginLeft">3dp</item><itemname="android:layout_marginRight">3dp</item><itemname="android:layout_height">wrap_content</item><itemname="android:layout_gravity">center_horizontal</item></style> - You can customize this button accordingly or instead of an above custom button, you can use the Facebook default button also as Facebook LoginButton.
- Make drawable file named 'bg_button_facebook.xml' in app -> res -> drawable folder and paste below code:
<?xmlversion="1.0"encoding="utf-8"?><shapeandroid:shape="rectangle"><cornersandroid:radius="5dp"/><solidandroid:color="#3B5998"/></shape> - Now initialize button in *.java file and some code to initialize Facebook SDK also:
privateButton mButtonFacebook;privateCallbackManager callbackManager;privateLoginManager loginManager;...@OverrideprotectedvoidonCreate(Bundle savedInstanceState){super.onCreate(savedInstanceState);setContentView(R.layout.activity_login);...mButtonFacebook= findViewById(R.id.button_facebook);FacebookSdk.sdkInitialize(MainActivity.this);callbackManager = CallbackManager.Factory.create();facebookLogin();...mButtonFacebook.setOnClickListener(newView.OnClickListener() {@OverridepublicvoidonClick(View v){loginManager.logInWithReadPermissions(MainActivity.this,Arrays.asList("email","public_profile","user_birthday"));}});...}... - Add 'facebookLogin' method outside onCreate() in java file. This is the code for Facebook login response.
publicvoidfacebookLogin(){loginManager= LoginManager.getInstance();callbackManager= CallbackManager.Factory.create();loginManager.registerCallback(callbackManager,newFacebookCallback<LoginResult>() {@OverridepublicvoidonSuccess(LoginResult loginResult){GraphRequest request = GraphRequest.newMeRequest(loginResult.getAccessToken(),newGraphRequest.GraphJSONObjectCallback() {@OverridepublicvoidonCompleted(JSONObject object,GraphResponse response){if(object !=null) {try{String name = object.getString("name");String email = object.getString("email");String fbUserID = object.getString("id");disconnectFromFacebook();}catch(JSONException | NullPointerException e) {e.printStackTrace();}}}});Bundle parameters =newBundle();parameters.putString("fields","id, name, email, gender, birthday");request.setParameters(parameters);request.executeAsync();}@OverridepublicvoidonCancel(){Log.v("LoginScreen","---onCancel");}@OverridepublicvoidonError(FacebookException error){Log.v("LoginScreen","----onError: "+ error.getMessage());}});} - Now add another required method 'disconnectFromFacebook' for login integration, similarly add this to outside onCreate. This is used to disconnect application from Facebook as no need to stay connected.
publicvoiddisconnectFromFacebook(){if(AccessToken.getCurrentAccessToken() ==null) {return;}newGraphRequest(AccessToken.getCurrentAccessToken(),"/me/permissions/",null,HttpMethod.DELETE,newGraphRequest.Callback() {@OverridepublicvoidonCompleted(GraphResponse graphResponse){LoginManager.getInstance().logOut();}}).executeAsync();} - Add 'onActivityResult' method outside onCreate in same activity:
@OverrideprotectedvoidonActivityResult(intrequestCode,intresultCode,Intent data){callbackManager.onActivityResult(requestCode,resultCode,data);super.onActivityResult(requestCode,resultCode,data);} - Now you are done with the coding. Run your application in you device or emulator. You can now login with Facebook also in your application.
- If you want to upload your app on play store, then you have to enable 'status' from top right section on Facebook for Developers, for this first add privacy policy url in settings -> Basic as per given in below screenshot. Now save the changes and enable status from dashboard.

Source: https://www.geeksforgeeks.org/how-to-create-a-facebook-login-using-an-android-app/
Belum ada Komentar untuk "Pull Facebook Feed Into Android Studio"
Posting Komentar